

What is Yandex Tag Manager?
For those familiar with tag management platforms, Yandex Tag Manager presents a robust, free solution designed to streamline the deployment and management of tracking scripts on your website. Integrated within the Yandex Metrica interface, this powerful tool eliminates the need for direct modifications to your site’s source code, allowing for agile and efficient management of various web analytics services, including behavioral, advertising, financial, and marketing tools.
Why Use Yandex Tag Manager?
The primary advantage of Yandex Tag Manager lies in its ability to simplify script management, empowering marketing and analytics specialists while significantly reducing the load on developers. Traditionally, setting up analytics systems, social media pixels, advertising codes, or call tracking required developers to manually insert specialized scripts into a website’s code. With Yandex Tag Manager, this process is transformed:
- Simplified Script Management: You can easily add, update, stop, or remove tags directly within the Yandex Metrica interface without touching the website’s source code.
- Empowering Specialists: Marketing and analytics professionals can configure and deploy events, such as tracking clicks on specific buttons or analyzing user journeys, with just a few clicks, bypassing the need for developer assistance.
- Reducing Developer Load: This self-service capability frees developers to focus on more complex tasks, accelerating the implementation of new scripts. For instance, setting up advertising events for Yandex Direct or installing call tracking systems, which previously required technical specifications and manual code insertion, can now be handled entirely within the Tag Manager.
- Rapid Adaptation to Changes: The tool enables quick responses to new requirements from advertising systems, API updates, or service testing, allowing for immediate adjustments without delays.
- Enhanced Security and Control: Each tag template undergoes a verification process, minimizing the risk of harmful code. The technology employs Sandboxed JavaScript, isolating code to prevent any negative impact on your website’s functionality.
Understanding the Core Components
Yandex Tag Manager operates on a fundamental triad of components: Tags, Triggers, and Variables, all managed within a single Container. A container serves as a unique unit for each website, consolidating all tags, triggers, and variables, effectively replacing the need for manual tag insertion across your site.
Tags
A Tag is a small piece of code designed to execute on a webpage, primarily to transmit data to external services like Variocube or Yandex View. Instead of manually embedding these fragments into your website’s code, Yandex Tag Manager allows you to create, configure, and edit them via a web interface. The “Tags” page provides an overview of all tags within your current container version, displaying their status (e.g., “Enabled” meaning active, or “Disabled” meaning saved but not active), associated triggers, and the date of their last modification. You can select from pre-configured templates, such as Yandex Metrica, or use a “Custom HTML” tag for arbitrary code.
Triggers
Triggers are the conditions that dictate when a tag should fire. A tag will only activate if it is linked to at least one trigger. Triggers monitor specific events on your website, such as a button click or a page load, and subsequently activate the corresponding tags. They essentially define when data is sent.
Yandex Tag Manager offers various types of triggers:
-
Page View Triggers: These triggers enable tags to fire at different stages of a page’s loading process, from the initial HTML parsing to the full loading of all resources.
- Initialization (Counter code initialization): Activates immediately during
<head>tag processing, before page content loads. Useful for sending basic data early. - Page View: Fires when the main HTML content begins loading. Ideal for recording page views.
- DOM ready: Activates after the HTML document is fully processed and the Document Object Model (DOM) is built. Suitable for tags that interact with page content or DOM elements.
- Window loaded: Triggers only after all page resources (images, scripts, styles) are completely loaded. Best for non-critical scripts that can run later.
- Common built-in variables available with Page View triggers include
Page URL,Page Hostname,Page Path, andReferrer. These variables can be used to set specific activation conditions, such as triggering only on a checkout page (Page Pathcontains/checkout) or excluding the homepage (Page Pathis not equal to/). It’s important to note that for single-page applications (SPAs), where URL changes don’t cause a full page reload, the “Special Event” trigger should be used instead of “Page View”.
- Initialization (Counter code initialization): Activates immediately during
-
Click Triggers: These allow tags to activate in response to user clicks on page elements.
- All elements: Fires when a user clicks any element (button, image, block). Use this for tracking clicks on various interface elements.
- Links only: Activates specifically when a user clicks an HTML link (
<a href="...">). Useful for tracking navigations or external links. - Built-in variables available include
Click Element,Click Classes,Click ID,Click Target,Click URL, andClick Text, alongside page information likePage Path,Page URL, andReferrer. Conditions can be set using these variables, for example, to trigger on a “Buy” button click (Click Textcontains “Buy”) or to exclude specific technical buttons (Click Classesdoes not containtest-button).
-
Form Submission Triggers: These triggers activate tags when an HTML form is submitted on a page, ideal for tracking applications, subscriptions, or other actions via standard forms.
- The “Form Submission” variant fires upon a standard HTML form submission and the
submitevent. - Available built-in variables include
Form ID,Form Classes, and page information (Page Path,Page URL,Referrer). You can set conditions such as tracking only a specific subscription form (Form IDequalssubscribe-form). If a form doesn’t trigger a standardsubmitevent (e.g., uses AJAX or React), a “Special Event” trigger is necessary.
- The “Form Submission” variant fires upon a standard HTML form submission and the
-
Special Event Triggers: This type allows tags to fire upon receiving a custom event manually pushed to the
dataLayer. This is particularly useful for tracking non-standard actions like custom clicks, form submissions via JavaScript, or events within SPAs. Alongside the event, you can pass additional parameters to thedataLayer, which can then be accessed by creating custom “Data Layer Variables”.
Variables
Variables are essential for refining trigger conditions and enriching the data sent with your tags. They provide additional information, making your collected data more detailed and useful.
- Built-in Variables: These are automatically available within Yandex Tag Manager, such as
Click Text,Page URL, orForm ID, providing immediate access to common data points. - User-defined Variables (Custom Variables): For more specific data needs, you can manually create variables to retrieve information from various sources like JavaScript, cookies, or the
dataLayer.
Managing Tags and Versions
Yandex Tag Manager provides a comprehensive interface within Metrica for managing your container’s configuration. The “Overview” section offers a quick assessment of your workspace’s current state.
Understanding Versions
The system distinguishes between two key container versions:
- Current (Working) Version: This is your draft workspace, containing all unsaved changes. These modifications are not yet live on your website and are visible only to you. This is the version you are actively working on and will eventually publish. The “Added / Modified / Deleted” fields indicate how many objects have changed compared to the published version.
- Published Version: This is the live version of your container actively running on your website, with all its tags, triggers, and variables affecting user behavior. Each published version has a unique “Version Number,” “Publication Date,” “Author,” and “Version Details” that summarize the changes. When you publish, your current working area becomes the new published version.
Tracking and Testing Changes
- Changes in the Workspace: This section provides a detailed table of objects (tags, triggers, variables) that have been added, modified, or deleted since the last published version, including their type, action, author, and modification date.
- Testing with Preview Mode: Before making any changes live, it’s crucial to test them. “Preview” mode allows you to simulate how your new tags will function without impacting actual users. This mode is activated via a cookie and the
_ytm_previewparameter. - Publishing Changes: Once testing is successful, you can publish your changes. You can also add a description to the version for easier tracking and control.
- Version History: Yandex Tag Manager maintains a complete “Version History” for your container, storing all published versions. This feature allows you to republish previous versions, revert to an earlier state, and compare different configurations. A function to “Select as latest version” to replace the current workspace with an older version is also in development.
Working with Templates
Templates are a powerful feature designed to simplify and accelerate your work within Yandex Tag Manager.
- Utilizing Pre-configured Templates: The platform offers a catalog of ready-made templates for various services, such as Yandex Metrica, Yandex View, Calltouch, Flocktory, and Admon. These templates come with pre-configured parameters, enabling you to quickly add services to your site without writing code from scratch, reducing the risk of errors compared to using “Custom HTML” tags. They are also regularly updated by developers and offer support channels.
- Creating Custom Templates: For services not found in the catalog or for highly specific needs, you have the flexibility to create your own custom templates. These can be used solely for your projects or even shared publicly with other users.
Activating Yandex Tag Manager
 To begin using Yandex Tag Manager, there are a few straightforward steps:
- Prerequisites: You must have a Yandex Metrica counter already created and installed on your website. If you already have a counter, no further code intervention is required beyond enabling the Tag Manager.
- Steps to Enable: Only the owner of the Metrica counter can enable Yandex Tag Manager. If you are not the owner, you will need to contact them or initiate a counter transfer.
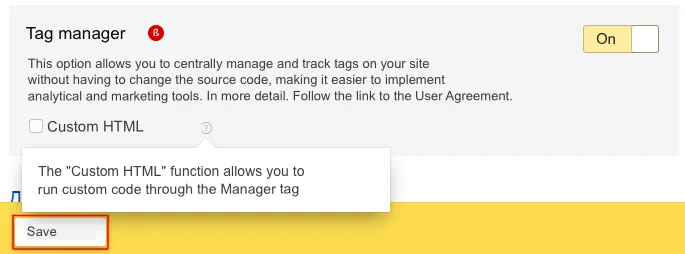
- Navigate to the “Settings” → “Counter” page within your Metrica interface.
- Enable the “Yandex Tag Manager” option.
- If needed, also enable the “Custom HTML” function.
- Save your changes.
- Access Permissions: It is crucial to understand that merely having editor access in Metrica is not sufficient to manage tags in Yandex Tag Manager; a special access permission specifically for the “Tag Manager” tool is required.
Yandex Tag Manager is a free and highly functional tool available within the Metrica interface, offering a comprehensive solution for managing web analytics and advertising tags. It serves as a universal platform, capable of configuring event tracking for Yandex Metrica, as well as integrating scripts from any other analytics system or third-party service. While Metrica’s auto-goals cover basic conversions, Tag Manager excels at tracking more complex user actions, such as visiting a shopping cart or selecting a payment method, through easily configurable JavaScript events.